Sunday, September 14, 2008

Back to basics

Nope, not unpacked yet, but getting there! We have so much more to do, and Dare doesn't agree that my crafts room is a priority ;)

Anyway, I have to make two cards by next weekend, so you'll see something new soon!

I've been planning on getting back into scrapbooking, as I'm quite behind in Chloe's book, and our wedding book, and my dad's scrapbook. So, for inspiration, I thought I'd post a few of my favourite pages:
I promise that there will be more to come!

Oops, typo!

I fixed it, but why didn't anyone tell me? It's like I had broccoli in my teeth or something. :p

Monday, September 8, 2008

More blog candy

Check out Scrappin in my Sparetime for some blog candy. Yum!

Saturday, September 6, 2008

Wednesday, September 3, 2008

Got scallops?

I've been wavering on the new SU scallop punch, but I think this cool frame technique that I found on Julie's blog (Paper Pleasing Ideas) has won me over:
(photo courtesy of Julie Buhler)

Julie also posted a tutorial on making the frame.

Tuesday, August 26, 2008

Finally back online!

We're moved in, and I just got the internet hooked up an hour ago! Unfortunately the crafts room is still in boxes, and I no longer have a desk, but hopefully that will change this weekend!

Stay tuned...

Thursday, August 21, 2008

A (not so) mini album

I've want to try making a mini album, so Danielle's calendar over at Fat Cat Stamper is bookmarked for future inspiration! She used a Bind-it-All and thick chipboard for the cover and binding, and then prettied it up with some paper, ribbon, and thickers.
Here's what one of the inside pages looks like. Each page uses the same layout, but with different images, paper, and colours.
(photos courtesy of Danielle Lounds)

Head over to Danielle's blog to see more photos of this adorable calendar!

Wednesday, August 20, 2008

Blog template ideas?

I think it's time to update the look of my blog, but I don't know if I want to do it all myself. I like the idea of changing it up every so often, but I just don't have the time right now!

If you use a template, from where did you get it?

If you designed your layout/theme yourself, can you give my any ideas for some quick and easy looks?

Tuesday, August 19, 2008

Altered Apple Box

When I saw Julie's project on her blog, Paper Pleasing Ideas, I was totally inspired. Too bad all my stuff is packed! Oh well, it's filed under "things to try". Hmm...maybe I should make that a label category!

Anyway, dollar stores are a great place to find alterable items, just like this apple box. And check out how she made the "lined" paper! I love how the 'a' looks like a chalkboard piece.

Go to Julie's blog to see more details about her Apple Box Creation (hee - get it? ABC).

(photo courtesy of Julie Buhler)

Sunday, August 17, 2008

The new catalogue - what are your picks?

I just ordered:

- Eastern Blooms (on sale right now, 15% off!)
- Hawaii Papaya DSP
- Wide Oval punch
- Hemp Twine (in natural)
- Chocolate Chip 1/4" grosgrain ribbon

Also on my wishlist:
- Pocket Silhouettes (on sale)
- Inspired by Nature
- Snow Swirled (on sale)
- Washington Apple DSP
- Haiku DSP
- Urban Garden DSP
- Green Tea DSP

I have a hard time with wide ribbon, so I'm holding off on any of that!

Thursday, August 14, 2008

More shrink plastic

Check out what Debbie at Thinking Inking did with this cute pineapple topper for a pen! It's part of a Blessings Journal that she made using the PaperTrey Ink First Fruits set (just released today!). I love how it coordinates perfectly with the journal. Check out her blog to see all the details about the project, including recommendations about using ink with shrink plastic.

(photo courtesy of Debbie Olson)

Wednesday, August 13, 2008

I need some PolyShrink

Remember Shrinky Dinks? The little plastic shapes that you baked and they shrunk to 1/3 their size?

Well shrink plastic is a perfect fit with stamping! PolyShrink is a popular choice with any crafsters. Check out what Niki did with shrink plastic - I LOVE these little black cat charms!

Be sure to stop by Niki's blog and check out the entire project.

(photo courtesy of Niki Estes)

Tuesday, August 12, 2008

Whiff of Joy Blog candy!

Creative Ideas by Katharina is giving away some yummy blog candy! As a fun twist, not only do YOU get a free set of four stamps, but you get to give away another set on your blog!

From Katharina:

Here is the deal:
  • The winner of my blog candy give away gets the complete Whiff of Joy Guardian Angel Collection by Elisabeth Bell ( 4 stamps ) for free
  • AND I (or better Whiff of Joy Stamps ) will host a blog candy give away on the winners blog. You can choose the terms and I will sponsor your blog candy with another complete set of the Guardian Angels
What do you have to do to qualify for my blog candy?
  • Subscribe to my newsletter or RSS feed (you can find it in my right sidebar). I know a lot of you already did this (Thanks so much!!). So if you are already a subscriber you already fullfilled this requirement :)
  • Post a link to my 100 000 hits blog candy on your blog
  • Come back here and let me know that you want to enter the draw

I will draw the winner with random.org on August 16th 8pm central European time - enough time to participate!! Good luck everybody!

Stamps: not just for cards!

I've only been stamping for a couple years, and haven't really tried anything other than paper crafts (cards and scrapbooking). There is, of course, an entire range of possibilities. While my crafts room is packed up and ready for moving, I thought I'd share some of my favourite non-card projects made by other craftsters.

Today is Nichole's paper bead bracelets. I've never tried this technique, but it's apparently popular with the elementary crowd ;)

I happen to have a large (unused) bottle of Mod Podge, so this project will be one of the first on my list after I unpack!

Monday, August 11, 2008

Rustic Branches

Another set I must have: Rustic Branches from Papertrey Ink. The set is being released on August 15th. I can't wait!

Check out what Nichole did with this set - lavender sachets!

And Heather (the designer of the stamp set!) has several samples using her set. Wow, how cool is that, using your own stamp set on projects!

The new Stampin' up Catalogue is online!

Check it out!

Oh gosh, where to start? The wide oval punch, Hidden Garden rub-ons, designer buttons, Eastern Blooms & Pocket Silhouettes stamp sets. Oh, and the new Flower Fusion. And Hawaii Papaya DSP. Ack, I better stop!

Sunday, August 10, 2008

Working outside my comfort zone

This card is for the first challenge on Stamping Links to Love (SCTL1), which is to create "outside of the box", aka your comfort zone. Well this card definitely fits in that category!

1. It's round.
2. I sewed on it.
3. The circles aren't all symmetrical (if you know me, you know this is a huge deal for me).
4. Aside from the ribbon and thread, there's no embellishment. No brads, eyelets, stickers, glitter, anything!

I started with one of the Carousel Notes from SU, and cut three smaller circles from cardstock and DSP. I stamped the image from Summer by Sea, and used my ink pads and blender pen to watercolour. I need more practice with watercolouring. I used my Marvy Giga scalloped circle punch to punch out the image, and then coloured the edge with my Chocolate Chip marker. Did I mention I just ordered 10 SU markers?

I really wanted to center all the circles, but it just didn't look right, so I moved them all to the side. Then I pulled out my mother-in-law's sewing machine (I'm borrowing it, but I need one for myself!)sewed them together. Then I sewed a couple times around the scalloped circle.

The green scalloped circle is the back of the card, and the brown circle forms the front of the card. I scored a line just off the edge, and sewed the two together, adding some Soft Sky ribbon for a bit of embellishment.
Stamps: Summer by the Sea
Paper: Wild Wasabi Carousel Note, Chocolate Chip, Groovy Guava, & Whisper White cardstock, Afternoon Tea DSP
Ink: Wild Wasabi, Chocolate Chip, Groovy Guava, Soft Sky (SU), Timber Brown (Staz-On)
Accessories: marker, ribbon (SU)
Techniques: sewing, watercolouring

Saturday, August 9, 2008

Tap. Tap. "Is this thing on?"

Um, hi. From the hit counter, I know people are visiting, but no one leaves me any love anymore! So yeah, just checking to see if this thing is working. I realize I won't have much in the way of new projects to share (although watch tomorrow for the second card before the big pack), but I hope you'll come by for a visit over the next few weeks. Feel free to say "hi" anytime :)

It's all packed up.

Yup, my crafts room is all packed. I want to cry :(

For a Friend

I just couldn't pack up the crafts room without one more card. Okay, two more! I stayed up until 2am last night, pushing myself to actually use my supplies, and enjoy it while I can! We move in exactly two weeks, so I imagine it will be at least three before I'll be able to dirty up my stamps again :(

Here's the first card, based on Heather's Color vs. Sketch challenge (HMSC5) and (HMCC2). I tried to follow both, although I varied the colours just a bit (white instead of Vanilla, and I don't have a Taken with Teal marker, so I used Tempting Turquoise).

The card base is embossed with the D'Vine Swirls CB folder. I used my markers to colour the stamp, and then "huffed" to moisten the ink before I stamped it. I hand drew a little border, inspired by Mary's border on this card.

I punched a small hole on either side of the sentiment, and ran the ribbon behind it. The ribbon is not SU, but I think it matches Chocolate Chip and Pretty in Pink perfectly! The green layer needed something, so I added a few white rub-ons. Three brads in the top right corner complete the look.

Stamps: For a Friend (SU)
Paper: Chocolate Chip & Whisper White, Summer Picnic & Bali Breeze DSP
Ink: none
Accessories: Love & Happiness rub-ons, markers, brads (SU); corner rounder punch (EK Success), 1/16" hole punch (Fiskars), D'Vine Swirls CB folder, vine rub-ons (Kaiser), ribbon (American Crafts)

Friday, August 8, 2008

Win free stamps!

All That Scraps is previewing their new August stamps. Check out the blog to win:

Bear Hugs
Olivia's Birdies

Good luck!

Thursday, August 7, 2008

Altered Brads, courtesy of Mel Stampz

Looking to add some "wow" to your brads? Check out Mel's tutorial on altered brads!

Funky trees

Pink Cat Studio has just released Limitless Limbs. I'm going to need this set. I love the curly tree! And the monkey, and the ghosts, and the fruit, and the cat, and the... The best part is that Pink Cat Studio is a Canadian company (located about 30 minutes from my house, actually!). The set is only $14, and shipping for one item is $1.26 (CDN)!

Check out what Lauren has done with it, here and here.

Packing up the crafts room. Sniff.

Yup, the time has come. I need to pack up my crafts room! We are moving in SIXTEEN days, so I can't put it off any longer.

To make up for my lack of new projects, I thought I'd share some of my favourite craftsters, their blogs, and their awesome projects. So please stick around!

Monday, August 4, 2008

Another use for rub-ons

I bought this shadow frame before we were married. I'd originally put in some of the decor from the wedding, but didn't like it. These white SU rub-ons look much better!

Nothing much to describe here. I used a bunch of the rub-ons from the Love & Happiness set.

Sunday, August 3, 2008

Cherry Suspension

For this card, I embossed the DSP (rather than cardstock) for a different look. The first time I embossed it, I realized that you can sand the top of the embossed image to give it a different look, but it didn't really go with this card. Of course I saved the piece for next time!

For this card, I wanted to use the suspension technique, which Beate describes in this tutorial. I used a large square scalloped punch for the window, so I could use my scalloped circle punch as the suspended image.


One thing I realized is that the floss doesn't stick to the tape very well, even if it's sticky tape. I'd use regular scotch tape to adhere the floss to the cardstock, and then sticky tape to adhere it all together.

I stamped the sentiment with Whisper White craft ink, and embossed it with clear powder. As you can see, I still have embossing issues :p

Cherry Suspension

Stamps: Tart & Tangy, Polka Dots and Paisley (SU)
Paper: Pumpkin Pie, Whisper White, Old Olive, Bashful Blue, Real Red, Summer Picnic DSP (SU)
Ink: Old Olive, Real Red, Only Orange, Whisper White craft (SU)
Accessories: Scallop Punch, 1 3/8" circle punch, Whisper White grosgrain ribbon, brads (SU); D'Vine Swirls embossing folder (CB), scallop square punch (Marvy), clear embossing powder (unknown), heat tool (Marvy)


This is the final post about the contents of the stationary box. I hope you've enjoyed it!

Saturday, August 2, 2008

Lots of Squares

Another simple card, this one relies on punches for almost everything! I punched the sentiment out with the Word Window punch, then wrapped the end around the back of the blue layer. A green rhinestone (is it a square or a diamond? those diamond Shreddies make me laugh) anchors it to the orange panel.


Lots of Squares
Stamps: Lots of Thoughts (SU)
Paper: Whisper White, Old Olive, Bashful Blue, Pumpkin Pie, Real Red, Summer Picnic DSP (SU)
Ink: Real Red (SU)
Accessories: Word Window punch, 1" circle punch, 1 1/4" square punch, 1 3/8" square punch (SU); blue ribbon (unknown), clear button (Making Memories), green rhinestone (unknown)

Friday, August 1, 2008

Cheery Cherries

This is a very simple card, so I won't bore you with a long spiel. If I were to do it again, I'd round the corners of the sentiment/mat and the actual card. Oh well, next time!

Cheery Cherries
Stamps: Tart & Tangy, Lots of Thoughts (SU)
Paper: Whisper White, Old Olive, Bashful Blue, Pumpkin Pie, Real Red, Summer Picnic DSP (SU)
Ink: Old Olive, Only Orange, Real Red (SU)
Accessories: Scallop Punch, 1 3/8" circle punch, 1 1/4" circle punch, 1 3/8" square punch, 1 1/4" square punch, Old Olive poly-twill ribbon (SU); orange rhinestones (Kaiser), D'Vine Swirls embossing folder (CB)

Thursday, July 31, 2008

Stationary Box IV (Love Notes)


The stationary box includes a set of three love notes. These cards are 3.5" square.

The first card is based off of a SheetLoad sketch. I added dots around the scallop circle with my white Sakura Glaze pen.
Red Apple Love Note
Stamps: Tart & Tangy (SU)
Paper: Whisper White, Old Olive, Real Red, Summer Picnic DSP (SU)
Ink: Old Olive, Real Red (SU)
Accessories: Scallop Punch, 1 3/8 circle punch, ticket corner punch (SU); eyelets (unknown), white Glaze pen (Sakura), Cropodile, D'Vine Swirls embossing folder(CB)


The second card (which is sitting on top of the stationary box lid) is quite simple, and doesn't use any stamps! I absolutely LOVE the Summer Picnic DSP, and used several pieces for this card. The apples fit into a 1" circle punch, and I used larger punches to create the mats. I used my Cropodile to line up the two lines of small holes.
Three Apples Love Note

Stamps: none
Paper: Old Olive, Pumpkin Pie, Summer Picnic DSP (SU)
Ink: none
Accessories: 1" circle punch, 1 1/8" circle punch, 1 1/4" circle punch, corner rounder punch, Whisper White grosgrain ribbon(SU); Cropodile, D'Vine Swirls embossing folder (CB)

The third card is inspired by oobinsnaffa's cards using Tart & Tangy. It was actually these cards that motivated me to use Tart& Tangy for the stationary box. I just love how they look with the scallop circle punch and the D'Vine Swirls embossing folder! I had to trim down the photo corner punches, as they were too large for the card. I also rounded all the corners on the card, including the photo corners! To make the holes in the scallops, I used my Cropodile.
Strawberry Love Note
Stamps: Tart & Tangy (SU)
Paper: Whisper White, Old Olive, Bashful Blue, Pumpkin Pie, Real Red, Summer Picnic DSP (SU)
Ink: Old Olive, Real Red (SU)
Accessories: Scallop Punch, 1 3/8" circle punch, photo corners punch, corner rounder punch, Whisper White and Old Olive grosgrain ribbon, brads (SU); Cropodile, D'Vine Swirls embossing folder(CB)

Wednesday, July 30, 2008

Stationary Box part III (gift tags)

Here's an easy one. I made four gift tags, using the tag and small tag SU punches. I actually don't own the punches, but bought a set of pre-punched cardstock from an eBay seller. Now I just want the punches for myself :p

I stamped off the fruit from Tart & Tangy (stamping off means inking the stamp, then stamping once on scrap paper, then stamping on the cardstock - it gives you a faded version of the image). Note that I forgot to stamp off the orange :p

Then I stamped the small sentiment and punched a hole with my Cropodile. Some ribbon is all that was needed to finish it off. I didn't knot the ribbon so that it can be tied to a gift bag or box (they're perfect for a bottle of wine!).
Gift Tags
Stamps: Tart & Tangy (SU); Calligraphy Messages (Hero Arts)
Paper: Whisper White, Old Olive, Bashful Blue, Pumpkin Pie, Real Red (SU)
Ink: Old Olive, Only Orange, Real Red (SU)
Accessories: tag punch, small tag punch (SU); ribbon (from Michael's)

Tuesday, July 29, 2008

Stationary Box part II

As mentioned in my previous post, the stationary box contains full-sized cards (with coordinating envelopes), love notes, gift tags, a birthday calendar, a stamp pocket, and a coordinating pen. I used this template from Addicted to Stamping.

The template calls for an address book, but I decided to make it a birthday calendar, with one page for each month. I printed the pages and the labels using the RGB values for Old Olive and Pumpkin Pie, which I found on the StampMonkeys blog. To tie the pen into the set, I opened it up, and slid a piece of DSP into the clear barrel.


Stationary Box
Stamps: Tart & Tangy, Simply Said, So Very (SU)
Paper: Pumpkin Pie, Bashful Blue, Summer Picnic DSP (SU); red, white (from Costco)
Ink: Old Olive, Real Red (SU)
Accessories: Scallop punch, 1 3/4" circle punch, 1 1/4" circle punch, Old Olive Twill ribbon (SU); 1 1/2" circle punch (EK Success)


I'll describe the contents of the box in my next few posts.

Monday, July 28, 2008

Too many blogs?

I follow quite a few craft blogs (52 at the moment!) and realized (several months ago) that it's too much work to check each blog for new posts!

Enter Google Reader. I use Google for just about everything, so this fits right into my personalized home page. I get a list of all the new blog posts, and can pick and choose which ones I want to read.

If you don't use Google, there's also Bloglines.

Hope this saves you some time! If you do use one, be sure to add my blog ;)

Stationary Box

Okay, so here's my big project, the one on which I've been working for the last week! It's a stationary box, complete with cards, love notes, tags, a birthday calendar, matching pen, and stamp envelope. I wanted it all to coordinate, so I used the Tart & Tangy stamp set, Summer Picnic DSP, and the Scallop circle punch.

Unfortunately I don't have Pumpkin Pie or Bashful Blue inks, so I used Only Orange and Soft Sky when needed. I used this template from Addicted to Stamping.

This was a gift for my mother-in-law's birthday, so I also made a coordinating card. I used the Happy Birthday embossing folder and then added Stickles to all the flowers. I decided it needed more "bling", so I added clear rhinestones all the way around the scalloped circle. The row of paper piercing under the ribbon was easy to line up, I just used my ruler to pierce at each 1/8" mark.

Cheers to You card
Stamps: Tart & Tangy, Lots of Thoughts (SU)
Paper: Pumpkin Pie, Old Olive, Whisper White, Summer Picnic DSP (SU)
Ink: Soft Sky (SU)
Accessories: Scallop punch, 1/2" circle punch, Whisper White ribbon, Old Olive ribbon, Ice Rhinestones (SU); 1 1/2 circle punch (EK Success), Stickles (Ranger), paper piercer (Making Memories), clear rhinestones (Kaiser), Happy Birthday embossing folder (CB)


I'll describe the contents of the stationary box in my next post.

Sunday, July 27, 2008

Glittered Dragonflies

Whew, I'm back after a small break from blogging. I did not, however, take a break from crafts! I've got plenty of cards and a fun project to share over the next few days.

Here's the first. It's a small card (3.5x3.5) and I made two of them. They were intended for the winners of my last blog candy giveaway, but I forgot to include them in the packages. Sorry ladies!

After stamping the butterflies, I used Stickles to colour their wings and bodies. It's very glittery in real life! I also added Stickles to the DSP and the 'i' in the sentiment.

The embossed background is courtesy of my new Cuttlebug. I can't stop using it!

Stamps: Warm Words (SU); dragonflies (unknown)
Paper: Old Olive, Groovy Guava, Very Vanilla, Close to Cocoa, Linen Prints DSP (SU)
Ink: Old Olive, Close to Cocoa (SU)
Accessories: Word Window punch (SU); square and scalloped square punches (
Marvy), D'Vine Swirls folder (CB), Stickles (Ranger)

Friendship Blooms

This is the first card I made with my new Cuttlebug machine! It embosses and diecuts. I expect I'll use it mostly for embossing.

I don't (yet) have any Groovy Guava ribbon, so I dyed the white ribbon using my ink pad. I used three colours on the sentiment, all with careful application of the full-sized ink pads!

Stamps: Friendship Blooms, Itty Bitty Backgrounds (SU)
Paper: Groovy Guava, Blue Bayou, Soft Sky, Whisper White (SU)
Ink: Blue Bayou, Groovy Guava, Soft Sky (SU)
Accessories: White ribbon, Fire Rhinestone (SU); Traffic Jam embossing folder (CB)

Tuesday, July 22, 2008

I won some yummy blog candy!

I'm so excited - I just noticed that Marti over at Pez-A-Doodle posted that I won her 25,000 hits blog candy! It's three Inkadinkadoo stamps (including a gorgeous Christmas Angel!) and three Brilliance pearlescent dew drop inks. Yay!

ps. I have a couple cards to post, but have to free up some space on my camera so I can take photos!

Friday, July 18, 2008

New ways to use your punches

As promised, here's how to make the orange "medallion" punched shape:

I punched out one scalloped circle (using SU's scallop punch), and then used a small square of removable adhesive to stick it on a piece of scrap paper:

Then I put it back in the scallop circle punch, but rotated it slightly:
When I punched that out and took the cardstock off of the scrap, I got this:

This technique also works with the five petal punch:
Here's the before and after for each:


This technique will work with most symmetrical shape punches (although circles would turn into, well circles), and may do some funky things with non-symmetrical ones. If you try any other punches, please post a comment with your results :)

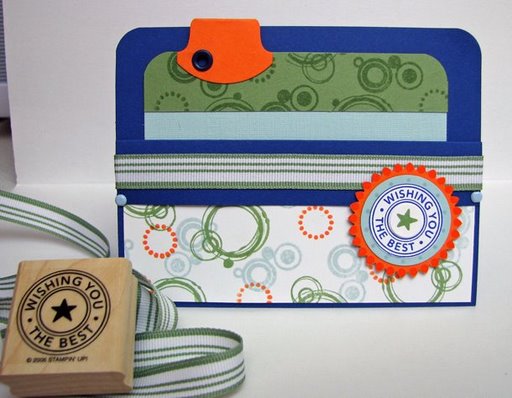
Wishing You the Best

During my daily blurfing aka. surfing all the blogs I follow - I ran across Michelle's pocket card. I haven't done one in a while, and felt inspired!
The pocket part is easy enough, you can use whatever dimensions you like. Basically you need a long skinny piece. Your typical 4.25x11" size works well. Fold it in half, then fold down one edge to make the front flap. You may want to trim the flap a bit as well. You can adhere the sides of the pocket with redline tape, and/or use brads to hold it closed.

Then trim a piece of cardstock to fit in the pocket. I like it to be shorter than the back of the pocket, but as wide as possible. I added a strip of carstock to the top of the card, and then a round punch tab and an eyelet.

TIP: To hide the ugly back of the eyelet, I punched through all the layers of the cardstock, and then set the eyelet through all but the last (back) layer. Then I adhered that layer, hiding the smushed backside of the eyelet.

Then decorate! I used a page from the SU catalogue for my colour inspiration, but I didn't have any DSP to go with it. Look how easy it is to creat your own! I used coordinating ink and my once-lost Inkadinkadoo circle stamps.

I also made a multi-layered medallion. Like the orange punched shape? You probably already have the tool to do it! I'll show you how in my next post...this one is getting a little long ;)

I left the tab and the main body of the card blank, so I can customize this card when I use it. I'm thinking it would make a good birthday card for my brother, so I can always stamp "favourite brother" on the tab (the joke is that he's my only brother!)

Stamps: Riveting, Circles and Dots (Inkadinkadoo)
Paper: Brilliant Blue, Only Orange, Soft Sky (incl. textured), Wild Wasabi, Whisper White
Ink: Brilliant Blue, Only Orange, Soft Sky, Wild Wasabi
Accessories: Scallop, 1/2" circle, 1 1/4", 1 3/8" circle, corner rounder, and round tab punches, Wild Wasabi Striped Grosgrain ribbon, Bashful Blue brads; dark blue eyelet (unknown)

Wednesday, July 16, 2008

Another card for JJS002

Here's my second try at JJS002. I used the sweet little Elzybells chick (from Jill), which I'd previously coloured and added Crystal Effects.

I knew it was a bit late for Easter, so I thought it would make a good baby card!

I pierced the pp and then used my white Glaze Pen to create faux stitching. If you follow the pen along the pierced line, letting it "bump" in and out of the holes, you get a stitched look.

This card opens upwards, so it was simple to tie the ribbon round the front.

For the small sentiment, I used a marker to colour just the words on the stamp. I used Stickles on the pp and the brads to add some sparkle.

Stamps: Very Punny (SU); chick (Elzybells)
Paper: unknown
Ink: SU (sorry, I can't remember which colours I used!)
Accessories: scallop punch, Crystal Effects (SU); Stickles (Ranger), Glaze Pen (Sakura), paper piercer (Making Memories), corner punch (EK Success), brads, ribbon (unknown)

Tuesday, July 15, 2008

My version of JJS002

Well, this is the card that almost wasn't. I had issues from the start, but decided to just work through them.

This card is based on JJS002, my second attempt at a card sketch. Due to the aforementioned issues, I flipped the sketch over.

The butterfly image is from when I was playing with the thumping and huffing technique. I coloured it in with Pure Colour pencils.

The little rounded shape peeking from the side of the handmade paper was made with the round tab punch (I don't have it, but I bought a big stack of pre-punched cardstock).

The mini brads at the base of the butterfly are attached on little circles of Blush Blossom (you'll have to click on the photo to see the larger size).

I sponged all the layers to distress it a bit. The ribbon goes through two small slits on the spine of the card, and the ends are hidden by more handmade paper on the inside. Whenever you use a dark colour as your card base, you'll want to add a lighter coloured layer on the inside, so you're able to see what you write!

Stamps: Vases in Vogue, Linen (SU); Butterfly (unknown)
Paper: Very Vanilla, Brilliant Blue, Blush Blossom (SU); handmade paper (from Costco)
Ink: Basic Brown (SU)
Accessories: Pure Color Pencils (SU); markers (Marvy), Cropodile, mini brads, ribbon (unknown)

Monday, July 14, 2008

Another sketch to try...

I thought I'd try another card sketch, and came up with this one (JJS002). If you give it a try, please leave a link to your blog (or gallery) in the comments section :)
I'll post my card later tonight.

Dreaming of my new crafts room...

**note: I will keep bumping this post up as I add to it, just in case any of you have any other ideas!

I've found an awesome blog with lots of ideas for crafts rooms and storage: Paula's Crafty Storage.

So I thought I'd start gathering ideas for my new crafts room! This post will be a work-in-progress. I'll continue to add to it as I go, up until the new room is finished. We don't get possession until August 23, so I've got lots of time to daydream.

Ideas/thoughts
- Chloe's Craft Corner: a friend (Hi Anne!) had a ne
at little craft station set up at her house, and I'm planning on borrowing some ideas, such as little pails on the wall for crayons, markers, etc and a roll of paper that pulls easily over the desk
- Layout/card storage: I like the string of projects held up by binder clips

- The photo below (courtesy of anng97
on SCS) has a bunch of ideas: peg board, rods for punch storage, baskets for misc storage:
Here's a different idea for ribbon storage - rain gutters! This photo is from pinkhedgehog's gallery on SCS:


- For some additional desktop storage, I need something like this SpinWorx caddy from Staples:


Here's a couple of awesome stamp rooms/ideas:
Capture the Moment
iStamp
Frantic Stampers
Scrappletini Ave

Wednesday, July 9, 2008

Wonderful Vase

Julee over at Poetic Artistry has a weekly challenge, Mojo Monday. This card is based on the mojo45 sketch. I decided to also give the colour challenge on SCS a whirl: CC174, aka. Groovy Banana Chips :p

I didn't think I'd like this colour combination, but I gave it a try. I don't have Barely Banana ink, and all I have left is 3/4 of a sheet of cardstock, so I used Groovy Guava as the main colour.

I inked the flowers with Old Olive and Groovy Guava, and then paper-pieced the vase. I used my corner rounder punch to make the scalloped border.

The Warm Words sentiment is too long for the Word Window punch, so I cut my strip to the width of the punch, and then put one end in through the bottom of the punch. That allowed me to punch just one end at a time, so I could make it as long as necessary. Let me know if that doesn't make sense, and I'll take a photo to show you.

The brads were already glittery, so I added some Stickles to the flower buds as well.I sponged all the layers and popped the main image and sentiment on dimensionals. Unfortunately the yellow brads did not agree with the ribbon, however it was too late, and I was too tired to redo it.

Stamps: Vases in Vogue, Warm Words
Paper: Chocolate Chip, Groovy Guava textured cardstock & DSP, Barely Banana
Ink: Groovy Guava, Chocolate Chip, Old Olive
Accessories: Corner rounder punch, word window punch, chocolate chip ribbon, sponge; Stickles (Ranger), glitter brads (Making Memories)
Techniques: paper- piecing, sponging

Tuesday, July 8, 2008

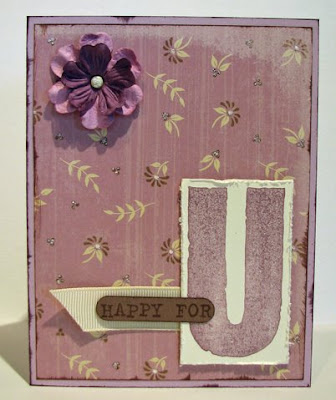
Just the sentiment please, ma'am

Allison over at Stampin' When I Can issues a challenge every Sunday called "Suggestive Sunday". This week was to use only a sentiment stamp, and no others (AFSS25).

I ended up cheating just a bit, as my sentiment came in two parts.

I don't have Pale Plum ink, so I used Perfect Plum for the 'U', but stamped off once to lighten it up. I distressed the edges of the 'U' with my scissors. I also added Stickles to the centre of the flower (over the brad) and on each of the dots on the pp.

Stamps: All About U
Paper: Pale Plum, Very Vanilla, Close to Cocoa; pp (K&Company)
Ink: Perfect Plum, Close to Cocoa
Accessories: Word window punch, Very Vanilla ribbon; flowers (Prima), Stickles (Ranger), brad (unknown)

Blog Candy Winners!

Had Chloe pull the names out of a hat (a plastic "firetruck" hat, according to Chloe) and the winners are:

For the "Retro" pack, Ms. Crafty If You're Nasty!

For the "Brights" pack, Jess!

Congratulations to you both! I've emailed you for your address.

Thanks again to everyone for reading my little blog. I realize I've been lacking in the crafts department lately, and have made a resolution to step it up! Starting with the card I made last night, which I'll post shortly :)

Sunday, July 6, 2008

UStamp - an online stamp class

If you're a fan of Stampin' Up, you may be interested in this new online class. It's hosted by Heather and Dawn. I've purchased SU products from Heather before, and I think she's awesome! When she announced their new venture, I couldn't wait to sign up.

So, check out UStamp, and if you join, please let them know that I referred you!

ps. They've also got a great kit available for use with the class, and it includes product from the new SU catalog, including that funky scalloped border punch!

pps. 1.5 hours left in the blog candy giveaway! ;)

Saturday, July 5, 2008

New SU accessory: scalloped edge punch!

Linda at Where the Rubber Meets the Road just received her (advanced demo) order of SU's new scalloped edge punch! Check out her quick video on how it works.

We're just home from camping, so I hope to get some time in the crafts room tonight.

ps. Just over one day left to enter the blog candy giveaway!

Wednesday, July 2, 2008

The new in colours - a comparison

Okay, I wish I had them in my hands, but Dawn over at DOstamping with Dawn has put together a great post on the new in colours, comparing them with existing colours.

I'm still not sure about the new colours (they seem to be brighter than shown on Dawn's blog), but we'll see how they look in all the projects in the new catty.

Because it's there...

...I have to try it:


Click the image to see a larger version, and then click "Create" (on that page) to make one of your own!

Tuesday, July 1, 2008

A little bit of sweet candy

Okay, it's finally here. My blog candy to celebrate 1000 hits! I'm almost at 1300, but let's just ignore that little fact, okay?

So, to make up for my tardiness, I've put together TWO blog candy giveaways! Just a little something to say 'thank you' for reading my blog. :)

Blog Candy #1 - "Retro"
A collection of (mostly) retro colours and images. There's ribbon, paper, Magic Mesh, a mini-scrapbook, jumbo eyelets, metal embellishments, die-cuts & tags, SU punched shapes, K&Co retro chipboard images, mini clothespins, and a whack of Prima flowers:
Blog Candy #2 - "Brights"
Well, brights and pastels, I guess. There's ribbon, paper, lots of die-cuts, Magic Mesh, SU punched shapes, a little Creative Memories paper/stickers set, a few square rhinestones, some googley eyes (I think they're hilarious on a kid's card!), a few clear buttons, and some Prima flowers.

So, how do you win one of these fun little packages? It's simple:

#1 - Spread the word. Share a link to my blog candy post on your blog.
#2 - Leave a comment on this post, with a link to your blog, as well as your favourite craft-related organizational tip. If you haven't heard, I'll soon have an entire room for my crafts, so I'm compiling a list of ideas!

I'll randomly pick two winners in exactly one week from now, so be sure to leave your comment on this post before next Sunday at midnight (PST). The blog candy is open to all of North America.

And thanks for helping me reach over 1000 hits!

Good news!

I found the missing stamp set. Somehow, it migrated down the side of my desk, and was on the floor next to the closet door. Whew!

More blog candy!

If you're sick of waiting for mine to be posted, check these blogs out:

Bunny-Zoe has reached 10,000 hits!

Thursday, June 26, 2008

I lost a stamp set

Wahhh! I went searching for my Inkadinkadoo Circles & Dots set, and can't find it anywhere! I tore apart the entire room, but I think it's long gone. I'm guessing it somehow got caught up in a pile of paper for recycling? Anyway, not a big deal, as I got the set on sale, but I'm still mourning the loss!

Oh, and you'll all be happy to know that I'm putting together the blog candy as I type. Well, not this exact second, but as soon as I hit "publish", I'll finish putting it together!

I hope to get it up on the blog tonight, but I must say that the Wii is calling me. I need to have another Wii Fit session, and tonight's the night for that too!

More yummy blog candy!

Justine over at Just Crafty is having an awesome giveaway to celebrate 4000 hits!

Check out this giveway over at Storage Units, Ink & More. I'm speechless (and that's hard to do).

My life's inky escape and more is having a drool-worthy giveaway (loads of stamps!).

Thanks to Ms Crafty for the links!

Tuesday, June 24, 2008

I'm newly discovered!

Check this out! Allison at Stampin' When I Can (love the blog name, I know how that is!) listed me in her list of "newly discovered" blogs. Fun stuff. Thanks Allison!

Whoo hoo! Over 1000 hits (plus some blog candy)

Check it out! I'm over 1000 hits. (Wow, over 1100 actually)!!!

Yes, I am planning to give away some blog candy. No, I don't have it ready yet. Patience, my pretties, patience.

While you're waiting, check out these awesome blog candy giveaways!

Starving Artistamps is giving away a pile of fun stamps...I'm partial to the "We all could use a bit of mystery in our lives" sentiment.

Markie's Mom is giving away a mystery box that sounds awesome. Check out her cool card style!

And you never know when you'll need to break out the popcorn. Enter for a chance to win at the Sunny Little Blog.

(thanks to Chelle for pointing these out!)

Saturday, June 21, 2008

Two challenges, one card

I made this card for Beate's weekend sketch (WSC53) and this week's SCS colour challenge (CC171).

It's hard to see, but the black is embossed with clear powder. I really need a Cuttlebug, as it was screaming to be embossed ;)

I love how the French Script background stamp looks on the Kraft paper! I used Soft Sky ink on the Kraft as well.

I cut around the stamped flower image, and then cut around it again in Soft Sky and Basic Black to "mat" the flower. I spun each layer, to create a full flower. With a brad in the centre, and the edges curled up, it stands out (with some help from a couple dimensionals).

To keep the ribbon simple, I cut a small slit in the fold of the card, and wrapped the ribbon all the way around. One end is adhered underneath the flower, I left the other out, to add some interest.

Three black rhinestones completed the card. I didn't add a sentiment, although it could be a nice birthday or even sympathy card.

Note the number of blog hits. I'm working on some blog candy for the big 1000!

Thursday, June 19, 2008

Blog Candy Challenge

Sarah at my scrapbook table has reached 50,000 hits on her blog! She's celebrating by having a blog candy challenge for...get this...a set of nesties!!!

One part of the challenge was to create a card based on this image:
Here's what I did:

As soon as I saw her inspiration image, I thought of Groovy Guava. Not quite as pink, but that's okay! I wanted to add a bird, but I don't have any that fit the theme. I didn't have time to go shopping, so the card is bird-free! I dyed the embroidery thread with my Groovy Guava and Blush Blossom ink pads. My fingers were a wee bit stained after that!

I was originally going to use some background paper, patterned paper, and ribbon, but decided to keep it quite simple, just like the inspiration piece.

Stamps: In the Spotlight, Vases in Vogue
Paper: Close to Cocoa, River Rock, Groovy Guava, Whisper White
Ink: Close to Cocoa, Groovy Guava, Blush Blossom, Whisper White craft
Accessories: Flower punch, Word Window punch, Corner Rounder punch; clear buttons (Making Memories), embroidery thread

Sunday, June 15, 2008

Happy Father's Day!

I'd made a card for my dad a couple months ago, but decided (today!) that he needed a different one. It didn't help that I really wanted to use my new stamp sets!

I wanted to distress the ribbon, to match the look of the card, so I dragged it on my Blue Bayou pad. I went a bit overboard on it though. Oops!

I love these screw brads, they're the perfect touch for a "manly" card.

Stamps: All About U, By Definition
Paper: Certainly Celery, Blue Bayou, Very Vanilla, Wild Wasabi
Ink: Certainly Celery, Blue Bayou, Wild Wasabi
Accessories: Vanilla ribbon, Certainly Celery ribbon, Photo Corner punch, Ticket Corner punch; "screw" brads

New stamps for me!

I scored some great retired SU sets off of Craigslist (click the link to see the image from the SCS gallery): By Definition (background), French Script (background), Linen (background), All About U, and Friendship Blooms. Don't be surprised to see some of them soon!

Glitch Free

I love this stamp set. It's called Computer Quips, and it's perfect for a geek like me! I made this card for another computer geek. It was my friend's dad's 60th birthday, and I knew he'd appreciate the sentiment ;)

The colour scheme was based off of the paper, which is SU Summer Picnic.

I used Stickles on the icing and flame, and Crystal Effects on the mouse, tag, and eyes. The ribbon is from Michael's, but it's a close match to Old Olive. Yes, I think in Stampin' Up colour when looking at things ;)

Stamps: Computer Quips
Paper: Pumpkin Pie, Old Olive, Bashful Blue, Summer Picnic DSP
Ink: Only Orange, Old Olive, Soft Sky, Going Grey, Close to Cocoa
Accessories: Photo Corner punch, Crystal Effects; ribbon, mini brad, eyelets, Stickles

Friday, June 13, 2008

Coming up on 1000 hits!

Whee! Don't be surprised if you see a bit of blog candy once I hit 1000 :)

ps. I'm working on a little card tonight. Hopefully I get it done and can post it tomorrow!

Sunday, June 8, 2008

Love Birds

I had to make an anniversary card, and found this sketch by Dawn Easton on Jen's i{heart}2stamp blog. I had a hard time with this card, as I didn't know what to do around the half-circle. I settled for some white dots with my Sakura glaze pen, but I still think it's missing something. The anniversary was today, so I had to give up.

The "love birds" were the inspiration for this card. I thought they'd make a cute pair, and added the heart above them to tie it all together.

I used my blender pen and ink pads to colour the birds (I need to work on my blending!) and used markers to colour the stamps for the branches. I used my scissors to distress the edges of the stamped image, and popped it up on dimensionals.

I first stamped the heard and then covered it with copper Stickles. Oh, and I traced a CD to make the half-circle. No nesties here yet!

Stamps: Polka Dots and Paisley; Forever Love (Inque Boutique); The Aviary Assortment (Inkadinkadoo)
Paper: Creamy Carmel, Soft Sky, Blue Bayou, Close to Cocoa
Ink: Soft Sky, Blue Bayou, Close to Cocoa; Groovy Guava
Accessories: Soft Sky ribbon, Blender pen; Copper Stickles (Ranger), white glaze pen (Sakura)

Sunday, June 1, 2008

Sweet Cheeks

I felt like scrapbooking today, so I came up with this quick page. All the photos are from the professional photoshoot we did when Chloe was just over six months old.

To make the background, I applied a bunch of rub-ons to basic white cardstock. Then I just added a few embellishments, the title, and the journalling strips.Paper: Certainly Celery cardstock, misc white cardstock
Accessories: Kaiser rub-ons, Making Memories stickers, brads, plastic flower